Friday, February 26, 2010

Oven Omelette

Oven Omelette

1 Yukon Gold potato, cubed
1/2 cup yellow onion, chopped
2 tablespoons butter
1 Roma tomato, chopped
2 green onions, chopped
1 cup Monterey jack cheese, cubed
1 (1/2 inch thick) slice of good quality ham, cubed
6 eggs
2-3 tablespoons milk
salt and pepper to taste

Preheat oven to 350 degrees.

Cube the potato and chop the onion. Add to an oven safe pan with two tablespoons of butter melted.  Cook, stirring frequently, until the potatoes are somewhat tender.  Add the cubed ham and cook for about 2 minutes.  Meanwhile crack your eggs into a large bowl.  Add milk and whisk.   Add chopped green onions, cubed cheese and salt and pepper.  Pour over the cooked potatoes, onions and ham.  Bake in the oven at 350 degrees for 20 minutes.  Cut omelette in half while in the pan.  Transfer to a plate and garnish with fresh tomato and green onions.

------------------------------------------------------------------------------------------------

{cooks note}

This recipe can easily be adapted for whatever you have in your fridge.  I just added whatever I thought would be good.  I like cooking omelettes in the oven verses the stove because I can forget about it.  Plus, there is no awkward flipping.  This makes for a very hearty breakfast ... or dinner, in my case.

I like using Yukon Gold potatoes because of their rich buttery flavor.  The tomato and part of the green onion will be used for garnish at the end.

Monterey Jack cheese, ham and green onions.


Cook the potatoes and yellow onion together in 2 tablespoons of butter.  This will take about 5-7 minutes on medium heat.

Once you think the potatoes are cooked enough, add the ham and cook for another 2 minutes.

Crack 6 large eggs into a bowl.

Add 2-3 tablespoons of milk.  The milk just makes the eggs turn out a little more fluffy, which is good for an omelette.

Whip the milk and eggs together really well. Incorporating air will help with the light texture you want to achieve for your omelette.

Add the chopped green onions and cubed cheese.


Pour the egg mixture over the cooked potatoes, ham and onions.
Make sure your pan is oven safe; otherwise, you will have some major problems.  Bake in the oven for about 20 minutes.

Hot out of the oven.  Don't forget that the handle to your pan will remain HOT for a while after taking it out of the oven.

Top with fresh tomatoes and green onions.


Thursday, February 25, 2010

Taco Seasoning

If you are like me, then you hate spending money on taco seasoning packets when you know you have everything for it right in your spice cupboard.  I have been making my own seasoning for about two years now and love it.  I never feel like I can't make something if I don't have a packet on hand.  Here is a great recipe.  It's really cheap to make too.  Most likely, you'll have all of the ingredients.


Wednesday, February 24, 2010

Oven Rice

Oven Rice
from my friend Jennie

2 cups white rice
3 cans Beef Consume (Campbell's brand)
1/4 cup butter, melted (half a cube)
2 tablespoons green onion, chopped
1 teaspoon oregano
1 cups water

Pour rice in a 9x13 glass baking dish.  Add the seasonings.  Pour liquids over rice.  Cover tightly with foil and cook in a 350 degree oven for 1 hour.

------------------------------------------------------------------------------------------------

{cooks note}

I love this rice!  It's so good and so easy.  You add everything together, pop it in the oven and forget about it for an hour.  You can also add mushrooms, but you all know how I feel about mushrooms.  My husband would love it if I put them in, but since I'm the one cooking, I get to rule the kitchen.  Ha! 


The ingredients, minus the green onions.  I've been seriously slacking lately. What can I say, I've got a bad case of the winter blues.  The Beef Consume can be found in the isle where you would find the soups.  I'm pretty sure you'll have everything else on hand.  


The rice with the seasonings.  Add the liquids last, cover tightly with foil and forget about it in the oven for 1 hour. 


When the rice is finished, it will come out looking like this.


This rice is good served with almost any type of barbecued meat.  You've got to try it.  The flavors are out of this world.


Tuesday, February 23, 2010

Chocolate Crunch Brownies

Chocolate Crunch Brownies
from my friend Ashley

1 cup butter, softened
2 cups sugar
4 eggs
6 tablespoons cocoa powder
1 cups flour
2 teaspoons vanilla
1/2 teaspoon salt
7-ounce jar marshmallow cream
1 cup peanut butter
2 cups chocolate chips
3 cups rice krispies

Cream butter and sugar.  Add eggs.  Stir in cocoa, flour, vanilla and salt.  Spread in a lightly greased 9x13 inch pan.  Bake at 350 for 25-30 minutes.  Cool.  Spread on marshmallow cream.  Melt chocolate chips and peanut butter in a glass bowl in the microwave.  Stir in rice krispies.  Spread over top and chill.  Serve.

------------------------------------------------------------------------------------------------

{cooks note}

First things first, DO NOT over-mix the batter.  You might have the urge to mix it with all of your might, but refrain.  You don't want them to be like cake.  Just mix until everything is combined.  I do mine by hand or with a hand mixer to ensure that they are not over-mixed.  Second, when heating the chocolate and peanut butter in the microwave, heat in 30 second intervals and stir each time.  Most of the time the chocolate will melt easily from the peanut butter being warm with a good stir.

The ingredients.  There aren't any other pictures of the steps because my camera battery conveniently died just after this. 

I did manage to snap this one seconds before it died.  She couldn't stop drooling over these...they are that good.

Three heavenly layers of goodness.  A soft brownie on the bottom, gooey cream in the middle and a chocolate peanut butter crunch on the top.  These will not disappoint.  

Sunday, February 21, 2010

Mustard Pork Chops


Mustard Pork Chops
Inspired by my mother-in-law

4 boneless pork chops (cut in half length-wise to equal a total of 8)
1/2 cup mustard
1 can Cream of Mushroom Soup
1 cup milk
flour for dredging
1 tablespoon seasoning salt
1 teaspoon pepper
3-4 tablespoons olive oil

Cut pork chops in half length-wise.  Cover each piece of meat in mustard and dredge in flour seasoned with pepper and seasoning salt.  Place in a skillet with hot olive oil on medium heat and cook until browned on the outside.  Just a couple of minutes each side.  Place in a 9x13 glass baking dish.  Mix soup with 1 cup milk and pour over the pork chops.  Cook in oven at 350 degrees for 45 minutes.  

------------------------------------------------------------------------------------------------

{cooks note}

My mother-in-law used to make something like this.  I couldn't get ahold of her when I wanted to make these, so I tried my own version.  These are really good and do not have a strong mustard flavor.  In fact, if you didn't know mustard was in them, you would never guess it.  I do not like Cream of Mushroom Soup, but I like this recipe with it; however, I do have to sieve all of the mushroom chunks out.  So, if you are like me, then this works great.  The milk/soup mixture makes a great gravy for the pork chops.  I cooked brown rice to go with this. Make sure you allow plenty of time for the brown rice to cook -- mine took 110 minutes in my rice cooker.  

The secret ingredient.


I used this soup with roasted garlic in it because someone had given it to me and that is all I had.  

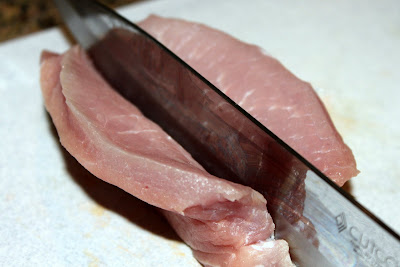
I bought these giants at Costco.  They were so thick that I thought I should cut them in half length-wise.  It worked out perfect.  

Sieve your soup if you do not like mushroom chunks like me.

If you have thick pork chops, cut them in half length-wise to equal a total of 8 pork chops after you have cut the original four.  Are you confused?  Yeah, me too.

Place half a cup of mustard on a plate.

Place flour, seasoning salt and pepper on a plate and mix together.

After covering the pork chop with mustard, dredge in flour mixture.  Note: this is a very messy job.  I put my surgical gloves on for this one.

Cook the pork chops on medium heat in olive oil for about 2 minutes on each side.

This is the brown rice I use.  It's really good but takes a long time to cook. 

I put it in my rice cooker and push the "brown rice" button.  I love my rice cooker.

After the pork chop has browned on each side.

Once they are all brown, place in a 9x13 glass baking dish and cover with the gravy mixture (not pictured).  Cook at 350 degrees for about 45 minutes.  


When done, the pork chops will be extremely tender.  I served mine on a bed of brown rice with a side 


Thursday, February 18, 2010

Croutons

Croutons

1 loaf of bread (french, sour dough, baguette)
6-8 tablespoons olive oil
3 tablespoons butter
2 teaspoons Lawry's garlic salt
fresh ground pepper

Cut bread into 1"-2" cubes.  Heat a large skillet and add olive oil and butter.  You may decide to add more olive oil depending on how big your loaf of bread was.  Give the bread a good stir to try and coat each piece of bread with the oil/butter mixture.  Cook on medium heat.  Next add the garlic salt while gently stirring the bread.  Add pepper to taste.  Heat a large skillet on medium heat and lightly stir the bread until it starts to turn a golden brown color.  Once the bread looks evenly cooked, place on a parchment lined cooked sheet and bake in the oven at 375 degrees for 10 minutes.  The croutons should be crunchy.

------------------------------------------------------------------------------------------------

{cooks note}

I know there are a variety of ways of making homemade croutons, but I have found this is the easiest for me.  They are super easy to make and last for quite a while in a zip lock bag or an air-tight container.  The great thing is, you can easily adjust the recipe.  Butter, or no butter.  More garlic salt, less garlic salt.  You do what you like.  I also use round sour dough bread loaves and the croutons turn out amazing.  Usually whatever bread is on sale at the time is what I get.

One loaf of French bread.

Cut bread into 1"-2" cubes.  Place in a large bowl.

Garlic salt and fresh pepper.  

Heat olive oil and butter in a large skillet on medium heat.  I like using butter because it helps give the croutons a great brown color that the olive oil can't achieve.

Add the cubed bread to the hot skillet and give it a good stir.  Measure in the 2 tablespoons garlic salt and pepper (to taste).  Stir to combine and cook until lightly browned.

Lay the croutons on a baking sheet lined with parchment paper.  Bake in the oven at 375 degrees for about 10 minutes or until croutons are crunchy and golden brown.  I add this extra step because usually the skillet doesn't get the croutons crunchy enough.  Take it or leave it.

Homemade croutons are so good and worth the little effort they take to make.


Wednesday, February 17, 2010

Fruit and Feta Green Salad

Fruit and Feta Green Salad
adapted slightly from Favorites

8 cups assorted greens
1/2 cup feta cheese, crumbled
1 (11-ounce) can mandarin oranges, drained
1/2 cup dried cranberries
1/2 cup toasted almonds
1/4 cup sliced apple (I used pink lady)
5 or 6 sliced strawberries

Dressing:
4 tablespoons raspberry wine vinegar
1/2 cup vegetable oil
1/4 teaspoon pepper
dash of Tabasco sauce
1/2 teaspoon salt
4 tablespoons sugar

Combine salad ingredients in large salad bowl.  Mix together dressing ingredients.  Pour dressing over salad just before serving.  

------------------------------------------------------------------------------------------------

{cooks note}

I generally use a mix of greens that I get pre-washed from Costco.  It's a large container for $3.99, and it lasts  about a week even though we eat it almost daily.  I also use my mini food processor to mix the dressing ingredients.  A blender would work great too.  You can experiment with different fruits and cheeses for this salad.  I like the combination featured above, but blackberries, raspberries and pears would also be good.


Tuesday, February 16, 2010

Whole Wheat Pizza with Mozzarella, Basil and Tomato

Whole Wheat Pizza Dough

1 1/4 cups warm water
2 teaspoons instant yeast
2 tablespoons sugar
1 tablespoon honey
1 tablespoon olive oil
2 teaspoons salt
1 1/2 cups all-purpose flour
1 1/2 cups whole wheat flour

Make the dough the night before or early on the morning you want to make the pizza.  In a large mixing bowl (or the bowl of a stand mixer), mix the water, sugar, yeast, honey and oil.  (If using active dry yeast, increase the amount of yeast to 2 3/4 teaspoons and proof the yeast in the water until foamy before mixing in the sugar, honey and oil.)  Then mix in 1 cup flour and the salt.  Knead until dough is soft and smooth, about 10 minutes by hand or 5 minutes using a stand mixer.

Shape the dough into a ball and place in a lightly greased bowl and cover tightly (with lid or saran wrap).  Place the dough in the refrigerator to slowly rise until three hours before baking.  Three hours before baking, remove the dough from the refrigerator and let it come to room temperature, keeping it tightly covered.

Bake pizza on a preheated pizza stone or on a pan dusted with corn meal.

*For more ways to bake a pizza visit here.

Toppings
a cook next door creation

3 Roma tomatoes, sliced
1 package of fresh mozzarella, cut into slices
1 package fresh basil
3 teaspoons olive oil
grated parmesan
Fresh ground pepper
Kosher salt

Preheat oven to 475.  Once pizza dough is formed, place the dough on a preheated pizza stone or baking sheet lined with parchment paper and lightly dusted with corn meal.  Drizzle 2 teaspoons of olive oil directly on the dough and spread around evenly.  Add the mozzarella, tomato slices and basil.  Sprinkle grated parmesan over the tomatoes.  Drizzle 1 more teaspoon of olive oil over the top.  Bake in a preheated oven at 475 degrees for 12-15 minutes.  Just after you take the pizza out of the oven, top with basil (chiffonade) and freshly ground black pepper and kosher salt.  

Pizza Sauce

*Makes enough for 2 16-18 inch pizzas

1 (14.5 ounce) can diced tomatoes
1 small can tomato paste
1 teaspoon sugar
1 teaspoon oregano
1 teaspoon basil
1 teaspoon garlic salt
pinch of red pepper flakes (optional)

Combine all ingredients in food processor or blender and blend until desired consistency.  All the seasonings can be modified depending on taste - add what you like!

------------------------------------------------------------------------------------------------

{cooks note}

This pizza crust is hands down the best homemade pizza crust I have ever had.  It was the perfect blend of white flour verses whole wheat flour.  I didn't make my dough ahead of time and stick it in the fridge.  I made it and let it rise for about an hour in a warm spot.  I don't have a pizza stone, so I just used a rimmed baking sheet lined with parchment paper and dusted with corn meal.  I chose to cook my pizza at 475 degrees because I wasn't using a stone.  I love the way the pizza turned out and so did my family.  The boys shaped a couple of heart pizzas (with my help) and had a lot of fun adding their two toppings.  The pizza sauce is really simple to make and very good.  Using fresh ingredients for your toppings is the only way to go when making homemade pizza.  Don't be intimidated by this--it is fast and easy.

My dough.  I line my bowl with a little olive oil before placing the dough inside.

The three fresh ingredients.

I bought this at Costco in a two-pack for $6.99.  I use about 1/2-3/4 of one package on our pizza.  The small mozzarella balls are also really good for this too.  

The dough rolled out and on the lined baking sheet.

Spread about 2 teaspoons olive oil over dough.

Layer pizza with mozzarella, tomatoes, grated parmesan and basil.  Drizzle with 1 teaspoon of olive oil.

The pizza sauce (used in heart pizzas below).

The parchment paper turned brown because I preheated my pan before I put the dough on it.  You don't have to do this.  I only did it on one of my pans.  Into the oven they go...

and out they come.

Top with freshly ground black pepper and kosher salt just after taking it out of the oven.  This pizza is just as good as it looks.  I promise.  

You'll want to make this a weekly tradition ... or every other night ... it's that good.